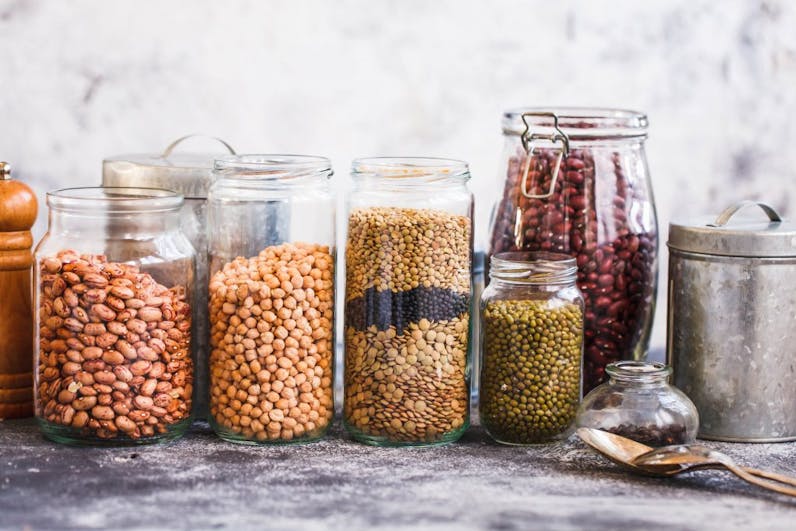
Lately we’ve seen a revival of sorts: a renewed interest in canning your own food at home! We can’t tell you how happy it makes us to see folks raising their own food, buying from local markets (or us, of course), and preserving it for year-round eating. We see a movement of working toward self-sufficiency in so many ways, and we are all about it. At Azure, we wholeheartedly believe in the value brought to the individual, the family, and the planet by growing and preserving foods at home.
During the supply chain crisis beginning in 2020, we began to see folks really waking up to the importance of looking out for their own food supply. I mean, we had runs on toilet paper, folks, remember? Sheesh. At Azure, we had trouble getting enough labels and packaging, but we also found it extremely difficult to get (and keep in stock) canning jars and supplies, both for our needs and for those of our customers. We knew something had to change.
And so we decided to produce our own. This was, In part, a response to the difficulty we ourselves had in securing canning supplies during the supply chain debacle of 2020 and beyond. But it was also part of something we had wanted to do for a long time—have our own cannery. Finally that dream was realized with Sweet Creek Foods, Azure’s new line of glass canned goods. We realized that not only did our customers need a reliable source for home canning supplies, we would need them for our canning line, too. We knew we could make a superior product, both for home canning and for our canning line, and that is exactly what we have done with the launch of Azure Canning Company!
Azure Canning Company
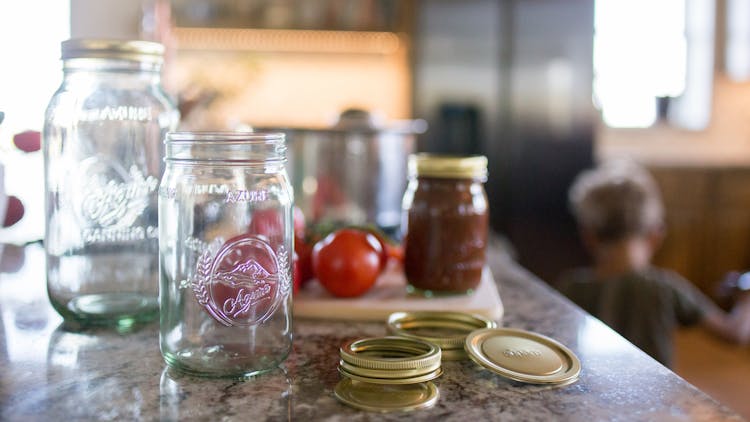
In case you’ve missed our announcement before, we have Azure Canning Company jars in stock and ready to ship to you for all your canning projects. We offer four options: 16 oz regular, 32 oz regular, 32 oz wide mouth, and 64 oz wide mouth. Our strong, safe jars are exceptional for high pressure canning; they’ve been tested to 10% greater strength than competitors (the 32 oz wide mouth tested equal to competitors). They’re also beautiful and unique, thanks to our Azure Canning Company logo (Mt. Hood and all!). We’ve been canning a long time, so the jars were thoughtfully designed to feature inward etching (most jars are lettered with outward embossing), ensuring labels stick to the jar (with smooth interior glass, for easy cleaning). We partnered with Superb to fit our jars with the best lids money can buy—made with five levels of corrosion protection and Blu-Seal™ Integrity. Superb’s no-warp lids and bands form for the most reliable, longest lasting, airtight seal possible.
You can find and purchase Azure Canning Company jars on our website. Also check out our pressure canner and canning supplies. We also have lots of good stuff to fill your jars, so if your canning dreams outpace your garden’s productivity, keep us in mind for your pantry projects!
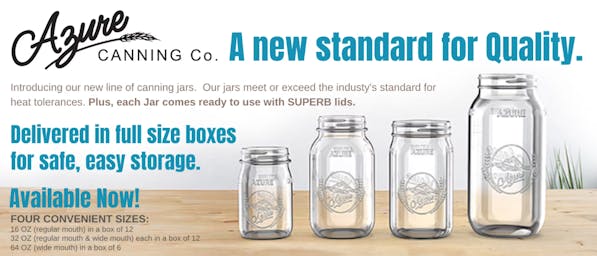
Azure Canning Co. jars are available in four useful sizes (pint, quart, quart wide mouth, and half gallon wide mouth).
With the sales pitch out of the way, now we want to talk about how to safely can your own foods and get you started on doing it yourself! Canning is a simple and cost-effective way to store the harvest without requiring refrigeration or freezing. It requires very little equipment, and once you get the hang of it, can be done even in brief windows of time; you can process seven quarts of fruit in less time than you can bake boxed brownies. Many of you may already have this skill down pat, but we hear from plenty of you who feel intimidated by the idea of it. Consider this your little nudge to push past those barriers and give it a go. As the saying goes, if you can boil water, you CAN can!
If you have mastered the basics of home canning, you might pass this article on to a friend, but check back next month. September’s Home Canning, Part 2 will focus on pressure canning and October's Home Canning, Part 3 will include recipes for canning stews, meats, winter squash, chili, and spaghetti sauce.
What is canning?
Canning is a simple method for food preservation which entails heat processing. You select the recipes and ingredients, add them to glass jars fitted with two-piece lids, and then heat them. Heat processing has several purposes: to kill microorganisms, inactivate enzymes that cause food to deteriorate, and create an airtight seal. Killing microorganisms and inactivating enzymes are necessary to preserve the food from spoilage. And creating a vacuum seal prevents further introduction of anything that could spoil your food.
Once you’ve canned your goods, your food is ready to be stored at room temperature for a year or even more, making meal prep easy and providing plenty to stock a nutritious pantry long past gardening season.
What are the benefits?
- Canning allows you to enjoy the abundant harvest year round
- Take advantage of sales and low prices when produce is in season; stock up!
- You know exactly what's in your food and where it comes from
- No additives or preservatives are needed
- Economical; cheaper than buying store-bought products
- Simplifies feeding your family wholesome foods
- Supplies you with quick and easy homemade meals/ingredients
- Space-saving, no freezing or refrigerating needed
- Requires no transportation burden
- Emergency preparedness, hedge against economic downturn
- It’s like a food savings account
- Many foods can be prepared simply with no special equipment
- Timeless, useful skill to share with the next generation
Let’s get right into some basic canning instructions for canning cherries, pears, and tomatoes, three fruits (yes, tomato is a fruit!) that are commonly canned and easy for beginners. We will use what is called “Water-Bath Canning” (also called “boiling water canning”) for these simple fruit recipes.
Water-bath Canning - Cherries, Pears, and Tomatoes
What you need:
- Canning jars (also called Mason jars): Don’t skimp here. You won’t want your work or your food to go to waste due to broken glass, so purchase quality jars, which will last a lifetime. Please note, it is important to use jars specifically made for home canning. Home canning jars (Mason jars) have a threaded neck to attach home canning lids and bands, and are made of extra-thick, heat-tempered glass. Azure Canning Co. sells the best on the market—our jars meet or surpass the strength of leading brands. (Also note that you must use standard-sized jars, not just any random jar you want to recycle. Recipes and instructions for timing and processing are based on the volume of these jars and their thickness, and your food safety depends on it.)
- Lids and bands: Two-piece lids form a vacuum seal to keep your food safe. The flat metal, rust-resistant lids, which have a soft, rubbery compound on the underside, are needed to ensure a seal. The bands allow just enough ‘give’ for air bubbles to be forced out during heating, while holding the lid to the jar through the process. We highly recommend Superb Lids and Bands, which are included with your Azure Canning Company jars.
- Stock pot or water-bath canner with rack. For these simple recipes, all you really need is a large stock pot that is at least 3 inches taller than your jars. You can buy a standard canning pot, which is usually 21 qts (meaning the pot could hold 21 quarts of liquid when full), and fits seven quart-sized jars. Most come equipped with a rack, which holds your jars upright and off the bottom surface of the pot. The rack greatly minimizes jostling and breakage because it keeps your jars from direct heat and allows water circulation for even heating. We don’t currently sell one, but you can pick them up almost anywhere you buy kitchen goods.
Optional:
- Bubble tool or nonmetallic spatula (in a pinch, use a chopstick)
- Jar lifter or tongs (costs about $7 and makes canning safer)
- Magnetic lid grabber (nice to have, and costs just a few dollars)
- White vinegar (to wipe lids for better seal, and to add to canner to keep jars from getting cloudy) (Add 2 Tbsp to the water in your canner)
Tips for Success and Safety
- Select the best and freshest ingredients possible. Ideally, you process foods the same day they are picked from the garden. Store in fridge if you can't use immediately.
- Whether you are using ingredients from your garden or market, always use high quality ingredients, harvested at peak.
- Thoroughly rinse your produce to remove soil. This greatly reduces risk of spoilage.
- Any produce that has rot, insect damage, bruising, or mold is not suitable for canning due to a higher risk of contamination and spoilage.
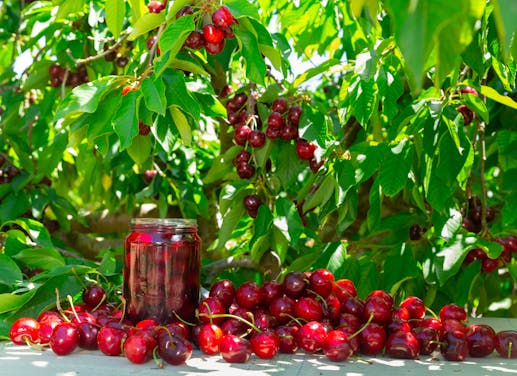
How to Process Cherries:
Wash your jars, lids and bands, and any other tools you plan to use in hot, soapy water. You’ll want to plan the correct number of jars for your recipe.
Begin by sterilizing the jars. Place your canning rack inside the canning pot. Load with your empty canning jars. Fill the open jars (without lids) and pot with water to 1” above the rim of the jars. Place on your stove and bring to a boil. You’ll want to plan ahead, having your produce ready to add to the jars as soon as your jars are sterilized, with no lag between. Boil for 10 minutes to sterilize the jars.
Prep your cherries, removing stems. Rinse to remove any dirt, and do not use any overripe fruit or fruit that is damaged. You can remove the pits or leave them in! We do it both ways, depending on how we plan to use the fruit later (and depending on how much time we have!)
Using a jar lifter or tongs, remove jars from the hot water and pour the hot water out. Place hot jars on a clean surface. (I like to use a board).
Pack your cherries into the jars.
Make a syrup mixture using 1 part honey to 3 parts very hot water (you can also make a syrup with sugar if you prefer). This is when a ladle or a funnel can be helpful. Pour the syrup over your cherries, leaving about ½ inch of headspace, meaning do not fill 1/2” space below the top of the jar. (As a general rule, you’ll leave ½” inch headspace for fruits and tomatoes. All canning recipes specify the amount of headspace required.)
Use a nonmetallic bubble tool or a spatula to gently scrape along the inner sides of each jar, releasing any air pockets.
With a clean, damp cloth dabbed in white vinegar, wipe the top rims of the jars to remove any food or syrup. This will help ensure a proper seal. Place a lid (freshly cleaned in hot, soapy water) on each jar, then a band. Using just three fingertips, screw the bands on to finger-tightness. Do not over-tighten! Using just your fingertips to twist will prevent you from overtightening, which interferes with a proper seal—air must release from the jars during processing and cooling.
Carefully lower each filled and lidded jar back into the canner. When all the jars are loaded, the water level should be 1-2 inches above the tops of the jars so that the jars remain covered with water through processing. Cover your canning pot with its lid, and return the pot to a boil. Begin timing the canning process when the water begins to boil.
Leave the jars in the boiling water for the entire processing time. Every recipe will have a recommended time, and to ensure food safety, it is important to follow these tested times. For cherries, the recommended processing time is 15 minutes for pints and 20 minutes for quarts. Make sure the boiling is continuous; if it is paused, you have to restart your time. (If you live more than 1000 ft above sea level, you’ll need to adjust the processing time. See the Altitude Adjustment Chart below). When the time is up, turn the burner off, remove the pot’s lid, and let the jars sit for about 5 minutes in the hot water.
Using jar lifter or tongs, remove each jar from the water-bath canner. I like to place mine on a wooden cutting board or a towel-covered surface, with at least an inch of space between jars to allow air circulation. Allow the jars to sit here for 24 hours, without being moved and without tightening bands. Just let them rest, so as not to interfere with the seal formation process. Do not expose jars to any sudden temperature changes.
Lightly press on the edge of the lids to ensure a proper seal has been made. Another benefit to using Superb lids is they have a distinctive popping sound that lets you know a seal has been formed.
After at least 18 hours have passed, carefully remove each band and wipe each jar clean. Store in a cool, dark place. We recommend you store your canned foods in a cool, dry location away from sunlight, ideally between 50 °F and 70 °F (but above freezing and below 85 °F will do!).
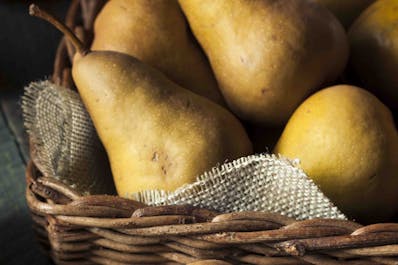
For Pears:
Follow the instructions above, making the following adjustments for pears. Wash your pears and cut in half lengthwise; then remove the core. Optional: To prevent darkening during heating, you may choose to dip pears into an ascorbic acid solution (3000 mg ascorbic acid to 1 gallon water) and then drain.
We recommend “hot packing” pears, which means you cook them prior to placing them in the jars. Make a quick syrup out of 3 parts water to 1 part honey, as above. Add pears and syrup to a pot and bring to a boil. Boil for 5 minutes. Then ladle the hot pears into hot jars, leaving ½” headspace, and cover with hot syrup, maintaining the ½” headspace. Remove bubbles or air pockets, wipe jar rims, and place the lids on as described above. Process using water-bath canning for 20 minutes for pints or 25 minutes for quarts. Adjust for altitude, according to chart below.
Bethany Joy Stelzer makes incredible homemade salsa!
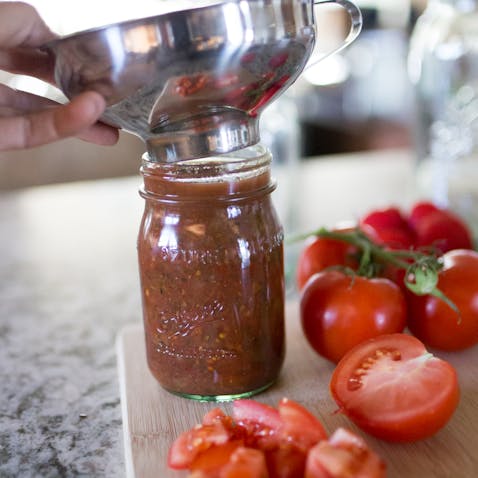
For Tomatoes, Whole or Halved:
When the tomatoes come in, we have our hands full. We use a lot of tomatoes through the year, so growing and canning our own can be a big cost savings. When using water-bath canning, you must add an acid to each jar to make the contents more acidic than tomatoes are on their own. We will go into more detail next month about the relationship between acidity, temperature, and pressure for safe canning. For now, just know this is necessary for your safety! See the Acidifying Tomatoes for Water-Bath Canning Safety chart below, and please be sure to follow it!
Wash tomatoes, and loosen their skins by dipping them into boiling water for about one minute, then toss them into cold water. This makes it much easier to remove the peel and core. Depending on size, you can cut your tomatoes into halves, quarters, or leave whole. Place your tomatoes in a pot and add water to cover them. Boil for 5 minutes.
While you are waiting for the boil, add acidifying ingredient (chart below) to each hot canning jar. Salt is optional (1 tsp per quart, ½ tsp per pint) and is only for taste—the small amount of salt used does not play a role in preserving your tomatoes, so feel free to leave it out if you’re watching your sodium intake.
When the 5 minutes is up, ladle the tomatoes into each jar (the jars and the tomatoes should both be hot for your hot pack), leaving ½” headspace. Add boiling water to cover the tomatoes, still maintaining the ½” headspace. Use a spatula or bubble tool to release any air bubbles, wipe the jar rims clean, and add lids as described above (do not overtighten!). Process pints for 40 minutes and quarts for 45 minutes. Adjust for altitude, according to chart below.
Acidifying Tomatoes for Water-Bath Canning Safety
Acidifying ingredient: Bottled Lemon Juice (not fresh)
- Amount per quart jar 2 Tbsp
- Amount per pint jar 1 Tbsp
Acidifying ingredient: Citric Acid
- Amount per quart jar ½ tsp
- Amount per pint jar ¼ tsp
You now have 7 quarts of food stored away for later use, without needing refrigerator or freezer space. As long as your seal lasts, which should be years, your food is safe to eat. However, quality will degrade—taste, texture, color, and nutrients all are diminished over time, so most folks aim for canning a supply that lasts you a year or two, and restock during the next year’s harvest.
Altitude Adjustment for WATER-BATH CANNING FRUITS AND TOMATOES
Altitude 1001-3000 feet - Add 5 minutes to processing time
Altitude 3001-6000 feet - Add 10 minutes to processing time
Altitude 6001-8000 feet - Add 15 minutes to processing time
OTHER FOODS
You can heat process many other foods using a simple water-bath canning method, too. Most fruits and tomatoes can be canned this way. However, the length of time and other details vary for each type of food, and you’ll want to consult tested recipes to be sure you are safely canning.
However, meats, poultry, fish, less-acidic vegetables, and mixtures containing these ingredients must be processed using a pressure canner, which is fitted with a locking lid and a pressure valve. A pressure canner allows you to raise the internal temperature beyond what can be achieved with water-bath canning, which is required for killing the microorganisms that could grow in lower-acid foods.
Next month, in Home Canning, Part 2, we will guide you through pressure canning, which is the only safe way to process low-acid produce, meats, fish, poultry, etc. You might consider investing in a pressure canner like the All American 1930, if you plan to delve into pressure canning. Pressure canners double as water-bath canners, so if you don’t already have a large water-bath canner or stock pot, and you only want to make ONE purchase, you might think about purchasing a pressure canner which you can safely use to process ALL foods. Additionally, pressure canners can be used to rapidly cook your meals—in ⅓ to 1/10 the time of conventional methods.
Foods that may be canned using Water-Bath Canning Process (temperature of 212 °F):
- Fruit
- Tomatoes
- Jellies and Jams
- Pie Filling
- Salsa
- Pickled Foods
- Spreads
- Sauces
- Vinegar
Foods that must be canned using High Pressure Canning Process (temperature of 240 °F or greater):
- Meat
- Poultry
- Fish
- Vegetables (low-acid)
- Soups and Stews
- Mixtures with any foods on this chart

Canning is an economical, colorful, practical and earth-friendly way to store the harvest.
Looking for more home canning resources?
You can download this free guide, the USDA Complete Guide to Home Canning. It includes detailed and accurate information on how to safely can just about anything. You’ll find exact processing times and temperatures for every food you might dream of canning, along with diagrams, pictures, recipes, and helpful tips including altitude adjustments.
There are also many wonderful modern recipe books for canning, and your local Ag Extension Agency likely offers workshops, demos, and free instructional resources.
We are excited to see so many folks reviving the art of food preservation, looking to secure a food supply for their families. The launch of Azure Canning Company reflects our commitment to supporting you in your efforts to provide for your family and community in a manner that is economical, planet-friendly, and healthy. We’d love to see YOUR canning recipes and feature them on our Azure Life blog. Share them here: Submit a Recipe.